

First of all, to do this you need VPOP3 Enterprise v9 as it supports dynamic updating of certificates, and the ability for an ACME client to update the web data dynamically, and for LetsEncrypt to access the ACME data.
LetsEncrypt commonly works by an ACME client utility on the web server computer injecting dynamically generated authentication data into the website, then calling an API at LetsEncrypt which validates this authentication data and issues a certificate.
This means that for this to work, VPOP3 must be publishing its Webmail onto the public Internet on ports 80 and 443.
Making Webmail accessible
So, you need to go to Services -> Webmail Server and add a binding for the relevant IP address (or ‘[Any]’) on ports 80 and 443. You can keep the binding for port 5108 if you wish, for backwards compatibility.
If there is some reason that you cannot do this, eg you don’t want to make Webmail accessible from outside, or you are using ports 80 and 443 for something else, then you cannot use the instructions in this article. Instead, you would have to use DNS authentication for LetsEncrypt. Some parts of the article may still be useful, but as DNS authentication requires integration with your DNS service, there are too many possible options, and that is outside the scope of this article.
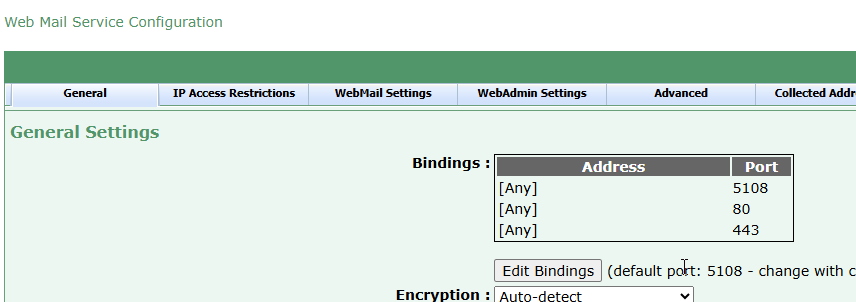
You also need to set up your firewall/router to allow incoming connections on ports 80 and 443 to go to the VPOP3 computer (using Port Forwarding or similar).
You must also set the IP Access Restrictions for the Webmail service to allow access from outside. So, go to the Services -> Webmail -> IP Access Restrictions tab and add a restriction to Allow – Any. Note that you can restrict it to certain users if you wish, LetsEncrypt will not be logging in, so only needs basic access
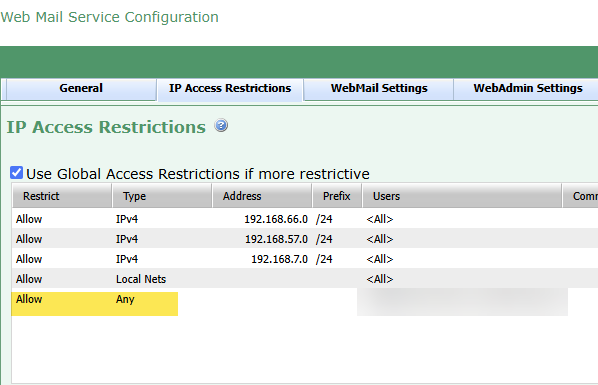
Check that Webmail is accessible from outside your network before continuing. Note that you do not need to be able to log in from outside, but the Login form must be accessible
Priming with a certificate
Next you must add a certificate into VPOP3 manually. This is needed because the functionality in this article just updates that certificate. VPOP3 will only refresh its certificate if a previous certificate already existed.
Note – If you already have a certificate installed, this step can be skipped
To do this, go to Services -> General -> SSL/TLS and press the ‘Add’ button and enter the certificate and key. For this article we will assume that this is the only certificate in VPOP3. VPOP3 v9 supports multiple certificates and can use SNI to determine which certificate to use, but that is beyond the scope of this article
The certificate you enter here can be a globally signed certificate or a self-signed certificate. It does not matter as it will be replaced soon. I have put a basic self-signed certificate below in case you can not easily create your own
Private Key
-----BEGIN PRIVATE KEY-----
MIIEvAIBADANBgkqhkiG9w0BAQEFAASCBKYwggSiAgEAAoIBAQDRfOh6TZq+SDeA
5oFqA3fnixOQj2R2hoRX8eTzOi3VWCR2Sl94QT48PcvBTJ7Jet9ri+gBgJ1AZslm
C+Ssg1yJ71LaFQ5W32A8d0P7YeCPkhhTnjN4UdIKA3aqqGyMdA90LxjEBf8SbzLI
BcGzOAJQoHlGO72banc7qnH6ciJbzcqG1QF2/710/72hkGqbhSmQi5/McaE9mRaA
ZC1qQfpfGJGbOllUa6XGiO30dp/0PyWgDtxk8ejKkoDpptdB2pjJPvCRErZXUxx3
QoPZrkFeeaRO/OXOJcCxi9AoGxeJVBIVG6DOZLk2gYkqR/62Kq+iI2UnSOJwHh6K
8rjHZd1vAgMBAAECggEAQD3HRxY8UYTw7GkDn8CPiSR3q/mlK8nFlPibptEdFBMz
H0lgbI7JaIzkypLWEOBK2n6td6R61LCQq2gTSKoB+1S2eiVB3/chWnmSkejqheyd
5CqcCxZATIzSW7RJkWrYAF+e/yH9nigWkQte4rhW0WXcuuKAG0RzawsyZ8SPb8om
TNBh2V8AFin4eWMKxgtbRKrt9YWkcTaErtiJAG+w2DMDB892OemZxQScQB8g4QtU
aIyCODbRyc4XTlb2w/Lu8RRl1SyNzKUS46jbxMC8n4b6ETei9hcswowsTITU0VWv
8heie5/xfdpOIH/lc8Oatdeew5JhhNID/6hTUfkhbQKBgQDztoLnS/ppCnM/d9i9
VN6J1s3LHTmkEPr+g+SDyG/LXrO6KA/CNsbu/13YrOLSO0BdhZaypwXw5MF6WRb3
cpxEZcDIIpZ1nJafSHTGa61c8E438QNNwPx8nXqvhD6hQOVPs/N2BeLW5nNhpUAb
nQUs3Be/dxiRIw2ukSAtjKZPJQKBgQDcDKuqrSPyIoPmO8Kxbw3Iwqly030Ubd4y
0gi7E7iNJhZSfnCDuVQJQSD9xNMHNoSrnDmfdnYssDkrWKVCheVmwArF05mr3yy3
QiFaO1uGKP7DVShiZX8vW3uZZjooY3gCguRoKfQIhCsr7E82rqtv/gSbsWJeuWZO
UFJHo2wwAwKBgFrRenqC36/hCw1ttcDoLX2kJFA6dc5j3YSW1cMeIDri8Yq/fw/a
pctOMkSaOHQrTFMNgxjUEOyx8j+Lj3lqpjz+xhZOfU8aqS52K739Rj9J9Xv3Pknt
TqmJbbyWRViF/G31GxayHtQCUKDkmb0wiEstQVRCJ09+hoy03A7dSORZAoGAe2E3
V6lgwEEOB6d2UJpd9jT/YXynYy7/KSuO7aXvEmVKmtJ+L71YGyBDaUZUtHSjCr27
qWd4dzIPu/gmIRiGOYhwAd/VCANIRTB1Fuy1MpIF1mwHCrSyDVGUCbzB2yd6gJ33
h1gOlj/VHPmQqK5jPZYF624YI9h8PmjW2YgN/xUCgYBioyTo/P5CbM+TuWSS0LFk
tWyKljKAmSB311jaW0DS5QZ3H+KuosLkVfxjUfAwLXMv8tmMQ1dEdBY8VQAS5M7T
+ppKWRvbBViBUGf4JKh1j7elW4hZDjYKo7CzKxMfLt2dMyYt8E08CtOcvMCFNXR7
j5or/uZ+DeTAUZxE1ofwrg==
-----END PRIVATE KEY-----
Certificate
-----BEGIN CERTIFICATE-----
MIIDkzCCAnugAwIBAgIUANtKgUN9fKtOxAqHR3QEIHDygk4wDQYJKoZIhvcNAQEL
BQAwWTELMAkGA1UEBhMCQVUxEzARBgNVBAgMClNvbWUtU3RhdGUxITAfBgNVBAoM
GEludGVybmV0IFdpZGdpdHMgUHR5IEx0ZDESMBAGA1UEAwwJbG9jYWxob3N0MB4X
DTI2MDgxMTA4MjU1NVoXDTM2MDgwODA4MjU1NVowWTELMAkGA1UEBhMCQVUxEzAR
BgNVBAgMClNvbWUtU3RhdGUxITAfBgNVBAoMGEludGVybmV0IFdpZGdpdHMgUHR5
IEx0ZDESMBAGA1UEAwwJbG9jYWxob3N0MIIBIjANBgkqhkiG9w0BAQEFAAOCAQ8A
MIIBCgKCAQEA0Xzoek2avkg3gOaBagN354sTkI9kdoaEV/Hk8zot1VgkdkpfeEE+
PD3LwUyeyXrfa4voAYCdQGbJZgvkrINcie9S2hUOVt9gPHdD+2Hgj5IYU54zeFHS
CgN2qqhsjHQPdC8YxAX/Em8yyAXBszgCUKB5Rju9m2p3O6px+nIiW83KhtUBdv+9
dP+9oZBqm4UpkIufzHGhPZkWgGQtakH6XxiRmzpZVGulxojt9Haf9D8loA7cZPHo
ypKA6abXQdqYyT7wkRK2V1Mcd0KD2a5BXnmkTvzlziXAsYvQKBsXiVQSFRugzmS5
NoGJKkf+tiqvoiNlJ0jicB4eivK4x2XdbwIDAQABo1MwUTAdBgNVHQ4EFgQU54YH
pIa+p0sDQoZhJ4HBwtMaHMgwHwYDVR0jBBgwFoAU54YHpIa+p0sDQoZhJ4HBwtMa
HMgwDwYDVR0TAQH/BAUwAwEB/zANBgkqhkiG9w0BAQsFAAOCAQEAKkCZeFqA0BtV
2+36R7Ux+baYp8QWqewZqG4R5tCc6wNy3ioxlNsl1uaN31FpNG51uW1vMfX5ndWT
bEATpmOrtwoywGU3AzVyLZl+uTilG4JHvThxZW97tXLidBh2HBN0zywM2keX/c1u
b5wp6YHmK5uHlwhuxtmmauDNewRHC8w7MYUVlgZ5dqfwDKIgGe8aNFLw/AVHdYz3
UxQhI6IYb3/f1OZ0U2920riqwBBgqgXA45sL4udl8iQkXTBCJEWis17mk+NAzOqH
NeMQlYjoGqPvV5LCd3bS1hgnUT9vddnZioDyr5nU4S/HqFhUNCj4gcUcvwOWtx+F
KT5U8X1hqQ==
-----END CERTIFICATE-----
Installing Powershell
For this article we will be using a Powershell script and using the PoshACME ACME client to authenticate with LetsEncrypt. We need Powershell 7 instead of Powershell 5 which is usually installed as standard
Instructions for installing Powershell 7 are available here. It is straightforward and usually doesn’t require a Windows reboot. It doesn’t replace Powershell 5, so existing Powershell scripts and functions should continue working as before
https://learn.microsoft.com/en-us/powershell/scripting/install/install-powershell-on-windows
Installing PoshACME
Once Powershell 7 is installed, open a Powershell 7 prompt, and install PoshACME by running
install-module -name posh-ACME -Scope AllUsersIn case you are interested, the documentation for PoshACME can be found at https://poshac.me/docs/latest/
Initial PoshACME setup
Now, you need to tell PoshACME to use LetsEncrypt
Set-PAServer LE_PROD(For testing, you could use LE_STAGE instead of LE_PROD. LE_STAGE doesn’t produce usable certificates, but also doesn’t have rate-limiting in place)
Then, you need to create an account at LetsEncrypt (if you do not already have one)
New-PAAccount -contact <email address> -AcceptToSNow, create a text file in the main VPOP3 directory called ‘cert.ps1’ and copy/paste the following content into it
#Install PowerShell 7
#
#install-module -name posh-ACME -Scope AllUsers

# New-PAAccount -contact <email> -AcceptTOS

# Scheduled Task
#      <Command>"C:\Program Files\PowerShell\7\pwsh.exe"</Command>
#      <Arguments>c:\vpop3\cert.ps1 <domain> <email></Arguments>
#      <WorkingDirectory>c:\vpop3</WorkingDirectory>

param (
 [String]$domain,
 [String]$email
)

# Uncomment the line below to write transcript to 'cert.log' file
#Start-Transcript -Append .\cert.log

function Deploy_test {
  param (
   $cert
  )
  echo $cert
  echo $cert.FullChainFile
}

function Deploy {
  param (
   $cert
  )
  echo $cert.KeyFile
  .\vpop3settings setfromfile sslpkey $cert.KeyFile
  .\vpop3settings setfromfile sslcert $cert.FullChainFile
  .\vpop3settings set sslreload 1
  echo "Certificate Installed"
}

$pArgs = @{
    WRPath = '.\_webmail'
}

if (Get-PAOrder $domain) {
 echo "Try Renewal of $domain"
 if ($cert = Submit-Renewal $domain -Verbose) {
  Deploy $cert
 }
} else {
 echo "Try New Order of $domain"
 if ($cert = New-PACertificate $domain -Verbose -Plugin WebRoot -PluginArgs $pArgs -AcceptTOS -Contact $email) {
  Deploy $cert
 }
}
Now, in the Powershell prompt, go to the VPOP3 directory and run
.\cert.ps1 <domain> <email address>

eg

.\cert.ps1 example.com support@example.com
This should make the script obtain a certificate for the specified domain, and install it into VPOP3
Setting up automatic certificate renewal
You can use Windows Task Scheduler to run the script automatically every day. It will renew the certificate when it comes close to expiry.
Open Windows Task Scheduler, and click on Create Basic Task.
- In Name put ‘Renew SSL certificate’ or similar. Press Next
- In Trigger, choose Daily. Press Next
- For Action, choose Start a program
- For Program/script enter the Powershell path – eg c:\program files\powershell\7\pwsh.exe
- In Add Arguments, enter c:\vpop3\cert.ps1 <domain> <email address>
(adjust the path and parameters as necessary) - In Start in, enter c:\vpop3
(adjust the path as necessary) - Press Next
- Select Open the Properties dialog for this task when I click Finish. Press Finish
- On the properties tag, choose Run whether user is logged on or not. Press OK You should be prompted to enter the account information for running the task, so enter the user details for someone with full-access permission to the VPOP3 installation directory and subdirectories (eg an administrator user)
Notes
- If you have multiple certificates, you need to alter the ‘.\vpop3settings setfromfile’ lines in the cert.ps1 script (lines 33 and 34). Eg, the second certificate will need ‘setfromfile sslpkey-1’ and ‘setfromfile sslcert-1’ etc. You can use ‘vpop3settings get sslpkey*’ to get a list of the private keys in VPOP3 along with their setting names, and adjust the script accordingly.
- If the script fails to install the certificates, when you run it again, it will not do anything because the certificate is not due for renewal yet, so you can edit the ‘Submit-Renewal’ command (line 45) to add ‘-Force’ after ‘-Verbose’). You should remove the ‘-Force’ afterwards to avoid unnecessary renewals